Raspbery Pi-Pico / Pico-Probe Testing and Work ups Part II
In this Part II guide we start learning the bells and whistles of a pico-probe being used in the OpenOCD environment.

- This is part II after we successfully converted a standard raspberry pico to a working pico-probe.
- There are very little (or really zero) working updated guides that build the entire debug-system / pico-probe sans Visual-Studio and only for Linux.
Raspbery Pi-Pico Conversion to a Pico-Probe Part 1
This simple guide goes over programming your raspberry pi into a pico-probe with hopefully CMSIS-DAP support!

- You should have a working pico-probe by now - but the only way is to test it.
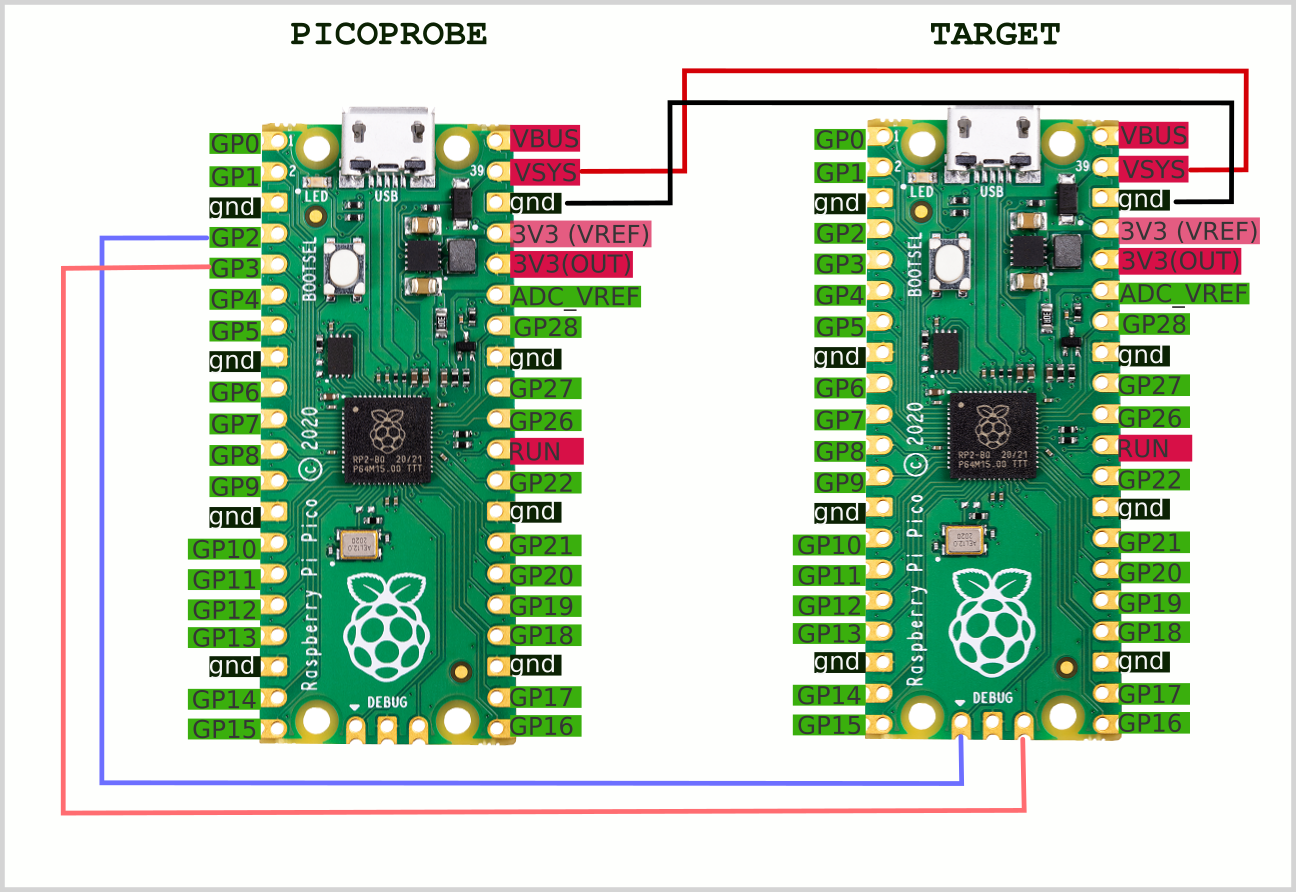
- Setup your circuit as shown above on the title image.
- Select a pre-compiled .elf file that we want to do a test load, and you can load/run it as:
sudo openocd -f interface/cmsis-dap.cfg -f target/rp2040.cfg -c "program ./spi_dma.elf verify"
- You should see an output like so:

To just load an .elf and exit we can use the following command:
sudo openocd -f interface/cmsis-dap.cfg -f target/rp2040.cfg -c "program ./spi_dma.elf verify" -c "shutdown"- It will do the same process and just exit.
Going faster:
sudo openocd -f interface/cmsis-dap.cfg -f target/rp2040.cfg -c "adapter speed 500" -c "program ./spi_dma.elf verify" -c "shutdown"
-c "adapter speed 500" - Good to Go!
-c "adapter speed 5000" - Good to Go!
- This programmed the entire device in about a second - nice!!!
- Can we push this farther...
-c "adapter speed 10000" - It worked!
OK, we will not push this farther, and if you have poor connections you are probably going to get errors etc so adjust to taste.
Getting OpenOCD to simply wait in listen mode:
sudo openocd -f interface/cmsis-dap.cfg -f target/rp2040.cfg -c "adapter speed 5000"You can see it will just wait and monitor as in:

Benefits:
- You no longer need the long setup cycles involving mounting the device, copying the file, rebooting - this whole process can be reduced down to about a second.
Getting a IDE to Work With it..
- Clion a bunch of stuff was tried and so far no success.
- Eclipse IDE is now being tested.


